5 Morning Stretches That Ease Back Pain and Keep You Strong After 50
You wake up, swing your legs out of bed, and immediately feel it—that stiff, achy sensation across your lower back that makes you move like you’ve aged 40 years overnight. For the first 20 minutes of every morning, you’re shuffling around, waiting for your body to “warm up” enough to function normally. If this sounds familiar, you’re not alone, and there’s a simple solution that takes just 10 minutes each morning. These five targeted stretches address the root causes of age-related back pain and can reduce your discomfort by 50-70% in just a month—here’s exactly how to do them.
The Back Pain Problems You’re Likely Experiencing

I’ve worked in the fitness industry all my life, as a qualified personal trainer for over 35 years and for the last 20 years, I have been the director of TRAINFITNESS, the UK’s leading provider of personal trainer courses.
Lower back stiffness, which is worst first thing in the morning, is what I see most often. People describe it as needing to warm up before they can move normally—walking around like they are 90 for the first 20 minutes of the day. The pain usually sits right across the lower back, sometimes shooting into one hip or down into the buttocks.
Movement avoidance is the second most common problem. Without realizing it, people start to bend differently. They avoid picking things up from the floor and sit down more carefully, bracing before they lower themselves. This is just our brains trying to protect us, but it actually makes things worse as we’re moving less and getting stiffer.
Upper back pain between the shoulder blades comes up a lot, too, especially in people who spend time at computers or looking down at phones. The muscles get locked in a rounded position and your chest gets tight. When you try to stand up straight, everything aches.
These issues are actually caused by changes in our bodies as we age. The discs in our spine lose water content—by the time we are in our fifties, they are typically around 20% less hydrated than at 30—meaning there’s less cushioning between the vertebrae. Our muscles also get weaker and tighter at the same time. The spine supporting muscles (especially the deep core muscles) stop activating properly, so our spines don’t have as much support as they need. Meanwhile, the visible muscles get chronically tight due to overcompensation.
The ligaments and connective tissue around your spine become less elastic, too. Think of them like elastic bands that have been stretched too many times—they don’t snap back the way they used to. This means your spine has less natural support, and you need to work harder to maintain good positions.
Why Morning Stretches Work So Well for Your Back Pain

Your spine literally shrinks overnight. When you lie down, gravity stops compressing your discs and they reabsorb fluid—you can be up to 2cm taller in the morning than at night. This sounds good, but it actually makes your spine temporarily stiffer and more vulnerable to injury. Morning stretches help transition your spine from this swollen, stiff state to being ready to move.
The overnight position is the other factor. Most people sleep in some variation of a curled position, even if they start on their back. Your hip flexors shorten, your lower back muscles get tight, and everything locks up. Six to eight hours in that position means your nervous system treats this as your new normal length. Stretching in the morning resets this.
There’s also a neurological component that matters more as we age. Our proprioception (the body’s sense of where it is in space) gets fuzzy while we sleep. Morning stretches essentially wake up the nervous system and remind your brain where your body is and how it should move. Without this, you’re more likely to move awkwardly and trigger pain.
The timing works with your body’s natural cortisol rhythm, too. Cortisol peaks in the early morning, which naturally reduces inflammation. Stretching during this window means you’re working with your body’s pain-relief system rather than against it.
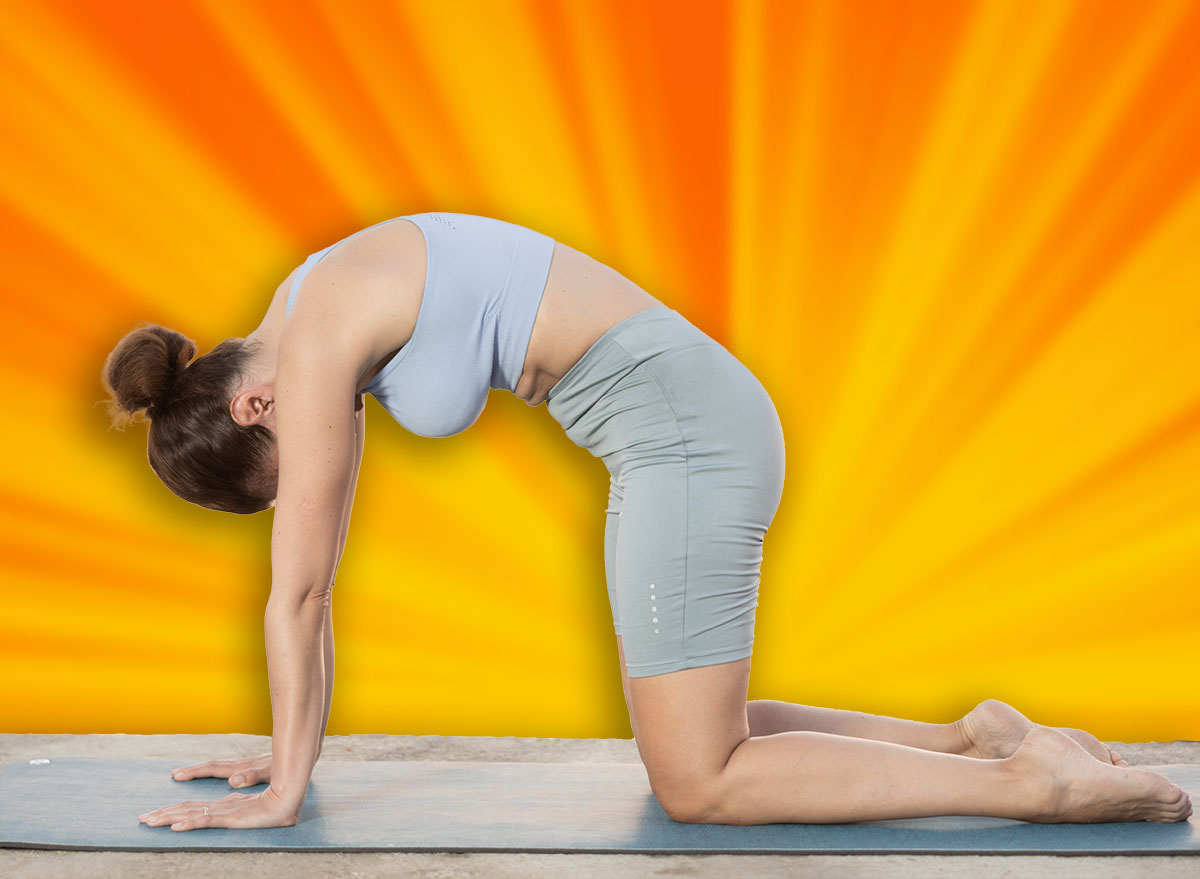
Cat-Cow Stretch
This mobilizes every segment of your spine individually and gets fluid moving through the discs. It also activates the deep core muscles that support your lower back without you having to think about it. The alternating movement pattern retrains your spine to move fluidly rather than in the rigid way most people with back pain start moving.
How to do it:
- Get on your hands and knees with your hands directly under your shoulders and knees under your hips
- Start with a neutral spine—not arched, not rounded
- Take a breath in, then as you breathe out, round your spine up like an angry cat, tucking your chin and pelvis under
- Hold for two seconds
- Breathe in as you reverse the movement, letting your belly drop down, chest opening, looking slightly up
- That’s one repetition
- Do 10 slow repetitions, taking about 6 seconds for each complete cycle
Avoid these mistakes:
The mistake I see constantly is people rushing through this. They treat it like a cardio exercise, bouncing through the movements. This doesn’t give your spine time to actually mobilize—you’re just flopping back and forth. The other error is overarching on the cow position, jamming the lower back. You should feel a gentle stretch, not compression. If your wrists hurt, try it with your forearms on a chair instead.
Knee to Chest Stretch
This targets the lower back specifically and creates space between the vertebrae that have been compressed all night. It also releases the piriformis and glutes which, when tight, refer pain into the lower back. The single-leg version is better than pulling both knees up at once because it gives you more control and creates a better stretch in the hip flexors on the extended leg.
How to do it:
- Lie on your back with both knees bent, feet flat on the floor
- Bring your right knee up and hold it with both hands just below the kneecap
- Gently pull the knee towards your chest—you’re not trying to touch your chest with your knee, just bringing it as close as feels comfortable
- The key is keeping your left foot on the floor and your lower back relaxed into the floor
- Hold this for 30 seconds while breathing normally
- Then slowly lower the right leg and repeat with the left
- Do this twice on each side
Avoid these mistakes:
People make two main mistakes here. First, they yank the knee towards them, bouncing it to get further. This triggers a protective response in the muscles and defeats the purpose. The stretch should feel gentle, not aggressive. Second, they lift their head and shoulders off the floor, trying to bring their chest to their knee. This tenses up the hip flexors you’re trying to release and can strain your neck. Keep your head down, relaxed.
Supine Spinal Twist
Rotation is the movement pattern we lose first as we age, and it’s the one that causes the most problems when it’s restricted. This stretch works on the thoracic spine (mid-back) and the muscles that connect your ribs to your pelvis. It also stretches the hip flexors and creates length through the entire side of your body. The rotation helps redistribute the gel-like substance inside your discs, which tends to migrate to one side overnight.
How to do it:
- Lie on your back with your arms out to the sides in a T position
- Bend your right knee and place your right foot on your left knee
- Let the right knee drop across your body to the left side—it doesn’t need to touch the floor
- Turn your head to look at your right hand
- Your right shoulder should stay on the floor as much as possible
- Hold this for 45 seconds, breathing deeply
- Come back to the center slowly and repeat on the other side
- Do this once on each side
Avoid these mistakes:
The biggest mistake is forcing the knee down to touch the floor when your body isn’t ready for that range. Some people will lift their shoulder off the ground to get their knee lower, which completely misses the point. The stretch should be felt through the lower back, outer hip, and along the side. If you can’t keep your shoulder down, your knee doesn’t need to go as far. The other error is holding your breath. Keep breathing normally throughout—tension anywhere in your body will limit how much you can release.
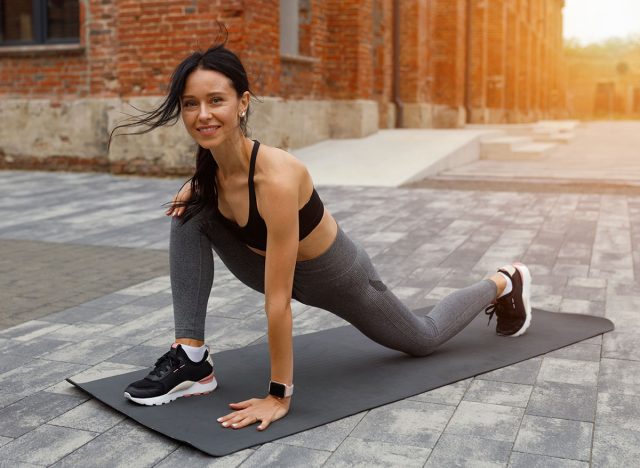
Hip Flexor Stretch (Low Lunge)
Tight hip flexors pull your pelvis forward, which increases the curve in your lower back and creates compression. This is often the hidden cause of lower back pain that people don’t realize they have. When you sleep, your hips are flexed for hours, so these muscles get particularly short overnight. This stretch releases them and allows your pelvis to return to a neutral position, taking pressure off your lower back.
How to do it:
- Start in a lunge position with your right foot forward, knee bent at about 90 degrees, and your left knee on the floor (use a cushion or folded towel under the knee if needed)
- Your right knee should be directly over your ankle, not in front of it
- Place your hands on your right thigh or on the floor either side of your foot for balance
- Keeping your body upright, gently press your hips forward until you feel a stretch in the front of your left hip and thigh
- You might need to tuck your pelvis under slightly to increase the stretch
- Hold for 30 seconds, then switch sides
- Do this twice on each side
Avoid these mistakes:
The most common mistake is leaning forward at the waist instead of keeping your torso upright. When you lean forward, you take all the stretch out of the hip flexor. Your chest should be up, shoulders back. The second error is letting the front knee drift forward past the toes, which puts unnecessary stress on the knee and reduces the stretch through the hip. If you feel this in your knee rather than your hip, adjust your position.
Child’s Pose with Lat Stretch
This decompresses the entire spine and creates space between all the vertebrae. It also stretches the lats (the big muscles on the sides of your back) which, when tight, restrict shoulder movement and cause upper back pain. The position gently stretches the lower back muscles and hips simultaneously. It’s one of the few stretches that addresses the whole posterior chain at once.
How to do it:
- Start on your hands and knees
- Sit your hips back towards your heels, keeping your hands where they are so your arms stretch out in front of you
- Your forehead can rest on the floor or on a cushion if that’s more comfortable
- Once you’re in this position, walk both hands over to the right side, keeping your hips centered
- You should feel a stretch along the left side of your back
- Hold for 30 seconds, then walk your hands back to center, then over to the left side for another 30 seconds
- Come back to center and rest for a moment before slowly rolling up to sitting
Tips for beginners:
People often let their hips lift up off their heels to get their forehead closer to the floor. This turns it into a shoulder stretch instead of a back stretch. Keep your hips back even if your forehead doesn’t reach the floor. The other mistake is not walking the hands far enough to the side—if you only move them a few centimeters, you won’t feel the stretch through the lats. Your hands should be quite far to the side, almost off your mat if you’re using one.
How These Stretches Build Strength, Not Just Ease Pain
Every time you move through a full range of motion, you’re training your nervous system to activate muscles in that range. When your back is stiff, your brain essentially forgets how to use certain muscles because you never ask them to work. These stretches remind your nervous system that these ranges exist and are safe to use. Over time, this neuromuscular connection gets stronger, and muscles that weren’t activating properly start firing again.
The stretches also create what’s called reciprocal inhibition. When you stretch one muscle group, the opposing muscles automatically activate to control the movement. For example, when you round your spine in the cat position, your abdominals activate. When you arch into cow, your back extensors work. This means you’re not just stretching—you’re actively strengthening the antagonist muscles.
There’s also a stability component that’s easy to miss. To stretch safely and effectively, you need to stabilize the parts of your body that aren’t moving. This stabilization work is where real functional strength gets built. In the hip flexor stretch, your core has to work to keep your torso upright. In the spinal twist, your obliques and deeper core muscles work to control the rotation.
As your range of motion improves, you naturally start moving better throughout the day. Better movement patterns mean your muscles work more efficiently and get stronger from your normal daily activities. It’s not dramatic strength building like you’d get from lifting weights, but it’s the kind of strength that actually matters for preventing pain—the deep, stabilizing strength that keeps your spine protected.
What You Can Expect After 2-4 Weeks of Daily Stretching

In the first week, the main change will be that mornings feel less daunting. You won’t have that same locked-up feeling when you first get out of bed. The pain won’t necessarily be gone, but the intensity typically drops by about 30-40%. You’ll notice that you can move more normally right away instead of having to wait for your back to warm up.
By week two, everyday movements start feeling easier. Getting in and out of the car won’t make you wince. Bending to put your shoes on won’t require the same careful planning. You’ll probably catch yourself moving more freely without thinking about it—turning to look over your shoulder, reaching for something on a high shelf. These are the movements you’ve been avoiding, and your brain starts to trust that they’re safe again.
After three to four weeks of consistent daily stretching, the pain should be noticeably better—often reduced by 50-70% from where you started. More importantly, your movement patterns will have changed. Your posture will be better without you having to think about it. You’ll stand taller, and sitting for long periods won’t make you as stiff. The morning stiffness that started this whole problem might still be there slightly, but it will resolve within a few minutes rather than hanging around for hours.
The thing to understand is that these results depend entirely on consistency. Doing the routine six days a week for a month will give you the results I’ve described. Doing it sporadically (a few times one week, once the next week, then forgetting for a week) won’t give you much at all. Your body needs the regular input to make lasting changes. After about a month, if you’ve been consistent, the improvements tend to stick even if you miss a day here and there. But those first few weeks require commitment.