5 Bodyweight Moves That Sculpt Arms Better Than Dumbbells After 50
Toning and strengthening your arms after 50 can feel like an uphill battle. After a lifetime of working in the fitness industry, as a group exercise instructor, a personal trainer, and now running TRAINFITNESS, the UK’s personal training course provider, I have trained thousands of people over 50. Once we reach that age, we do face challenges—but they aren’t insurmountable, and with the right strategy, older adults can thrive. Here are the best bodyweight moves to sculpt your arms without ever picking up a dumbbell.
The Challenges You Face After 50

The biggest challenge is that we lose muscle in our arms faster than almost anywhere else in the body. After 50, your triceps (the back of your upper arms) can lose up to 30% of their muscle mass over the next two decades if you’re not actively working them. This creates that loose, undefined look that frustrates so many people.
Also, our tendons and ligaments lose elasticity as we age—this means our shoulders and elbows just won’t tolerate heavy, repetitive movements the same as they used to. What was easy in our 30s, now carries a real injury risk if we push too hard, too fast.
Most people over 50 have some degree of shoulder stiffness or limitation. Years of sitting at desks, driving, and general lack of overhead movement leaves your shoulder joints restricted. When you try to do arm exercises, your shoulders compensate in ways they shouldn’t, leading to discomfort or injury rather than strength gains.
Coordination also becomes an issue. Our nervous systems aren’t as efficient at recruiting muscle fibres as we age. This means we can feel like we’re working hard, but we’re not actually engaging the muscles effectively. Our brains and muscles need retraining to work together properly.
Another challenge is that many people over 50 have never done consistent arm training. You can’t just pick up where you left off decades ago or jump into advanced movements. Your joints aren’t prepared for it, and your muscles have forgotten the patterns.
Why Bodyweight Beats Dumbbells
Bodyweight exercises force you to move your entire body as one unit rather than isolating muscles. This is exactly what your body needs as you age. You’re building functional strength that actually transfers to daily activities like pushing yourself up from the floor or lifting shopping bags.
With dumbbells, people tend to use momentum or compensate with other muscles to lift the weight. Bodyweight movements make these bad habits much more obvious. If your form breaks down, you feel it immediately. This built-in feedback keeps you safer and makes your training more effective.
Bodyweight exercises are also infinitely adjustable. You can make a push-up harder or easier just by changing your body angle. With dumbbells, you’re locked into whatever weights you own. Most people don’t have enough variety of dumbbells at home to progress properly.
Your joints tolerate bodyweight exercises better because the load is distributed across your entire body rather than concentrated in your hands and wrists. There’s less shearing force on your shoulder and elbow joints. This matters enormously when you’re dealing with age-related joint stiffness.
Bodyweight training also builds stability alongside strength. When you do a push-up, your core has to work to keep your body stable. When you curl a dumbbell, your core does nothing. That full-body engagement is what keeps you functional and injury-free as you age.
Incline Push-Up
This works your chest, shoulders, and triceps while being significantly easier on your joints than floor push-ups. The elevated hand position reduces the load you’re pushing and makes it accessible for people who haven’t done upper body training in years.
How to do it:
- Find a sturdy surface about waist height—a kitchen counter, sturdy table, or back of a sofa.
- Place your hands slightly wider than shoulder-width on the edge.
- Step your feet back until your body forms a straight line from head to heels. Your arms should be fully extended.
- Lower your chest toward the surface by bending your elbows, keeping them at roughly 45 degrees to your body.
- Go as low as you can with control, then push back up.
- Your body should stay rigid throughout—no sagging hips or sticking your bottom in the air.
Common mistakes to avoid:
- Flaring your elbows straight out to the sides. This puts unnecessary stress on your shoulders. Keep your elbows at that 45-degree angle.
- Not going low enough—your chest should nearly touch the surface.
- Holding your breath. Breathe in as you lower, out as you push up.
- If your shoulders hike up toward your ears, you’re too tense. Pull your shoulder blades back and down.
To make it easier:
Use a higher surface. The higher your hands, the less bodyweight you’re pushing. Start with a kitchen counter if needed, then progress to a lower surface as you get stronger.
Tricep Dips on Chair
This specifically targets the triceps (back of your upper arms) which is where most people over 50 see the most noticeable looseness and weakness. It’s also one of the few bodyweight exercises that truly isolates this muscle group.
How to do it:
- Sit on the edge of a sturdy chair or bench.
- Place your hands on the edge next to your hips, fingers pointing forward.
- Slide your bottom off the edge and walk your feet forward until your legs are extended but not locked. Your heels should be on the ground.
- Lower yourself by bending your elbows until they reach roughly 90 degrees. Your bottom should drop straight down, staying close to the chair.
- Push back up until your arms are straight but not locked.
Common mistakes to avoid:
- Letting your bottom drift too far forward, which turns this into a shoulder exercise rather than a tricep exercise. Stay close to the chair.
- Bending your elbows beyond 90 degrees—going too deep puts excessive stress on your shoulder joint.
- Shrugging your shoulders up. Keep them pulled back and down throughout.
- If you feel this in the front of your shoulders rather than the back of your arms, your form is off.
To make it easier:
Bend your knees and place your feet flat on the floor closer to your body. The more bent your knees, the less bodyweight you’re lifting.
Wall Slides
This strengthens your shoulders and upper back while improving shoulder mobility at the same time. It’s particularly good for people who have stiff shoulders from years of poor posture. It builds the muscles that pull your shoulders back and down, creating better posture and more defined arms.
How to do it:
- Stand with your back against a wall, feet about 6 inches away from it.
- Press your lower back, upper back, and head against the wall.
- Raise your arms and place the backs of your hands against the wall with your elbows bent at 90 degrees, roughly level with your shoulders. This is your starting position.
- Slowly slide your arms up the wall, keeping your hands and elbows in contact with the wall.
- Go as high as you can while keeping everything touching the wall.
- Pause at the top, then slowly slide back down to the starting position.
Common mistakes to avoid:
- Letting your lower back arch away from the wall as you raise your arms. Keep your core engaged and your back flat against the wall throughout.
- Forcing your arms higher than your shoulder mobility allows. If your hands or elbows come off the wall, you’ve gone too high.
- Rushing the movement—this should be slow and controlled.
To make it easier:
If you can’t keep your hands on the wall throughout the full range, just go as high as you can while maintaining contact. Your mobility will improve with practice.
Pike Push-Up
This targets your shoulders more directly than standard push-ups while still engaging your triceps. It’s excellent for building the rounded shoulder definition that gives arms a toned, athletic look. It also builds overhead pressing strength that most people over 50 have completely lost.
How to do it:
- Start in a standard push-up position on the floor.
- Walk your feet forward and raise your hips up until your body forms an inverted V shape.
- Your hands should be slightly wider than shoulder-width.
- Keep your legs as straight as comfortable—a slight bend in the knees is fine.
- Lower the top of your head toward the floor by bending your elbows. Your elbows should bend out to the sides rather than back toward your feet.
- Press back up to the starting position.
Common mistakes to avoid:
- Not keeping your hips high enough. Your bottom should stay pointing toward the ceiling throughout the movement. If your hips drop, you turn this into a regular push-up.
- Letting your head drift forward. Lower straight down between your hands.
- Holding your breath.
- If you feel this in your lower back, your core isn’t engaged properly.
To make it easier:
Don’t go as deep with your head. Even a few inches of movement is enough to build strength. As you get stronger, gradually increase your range of motion.
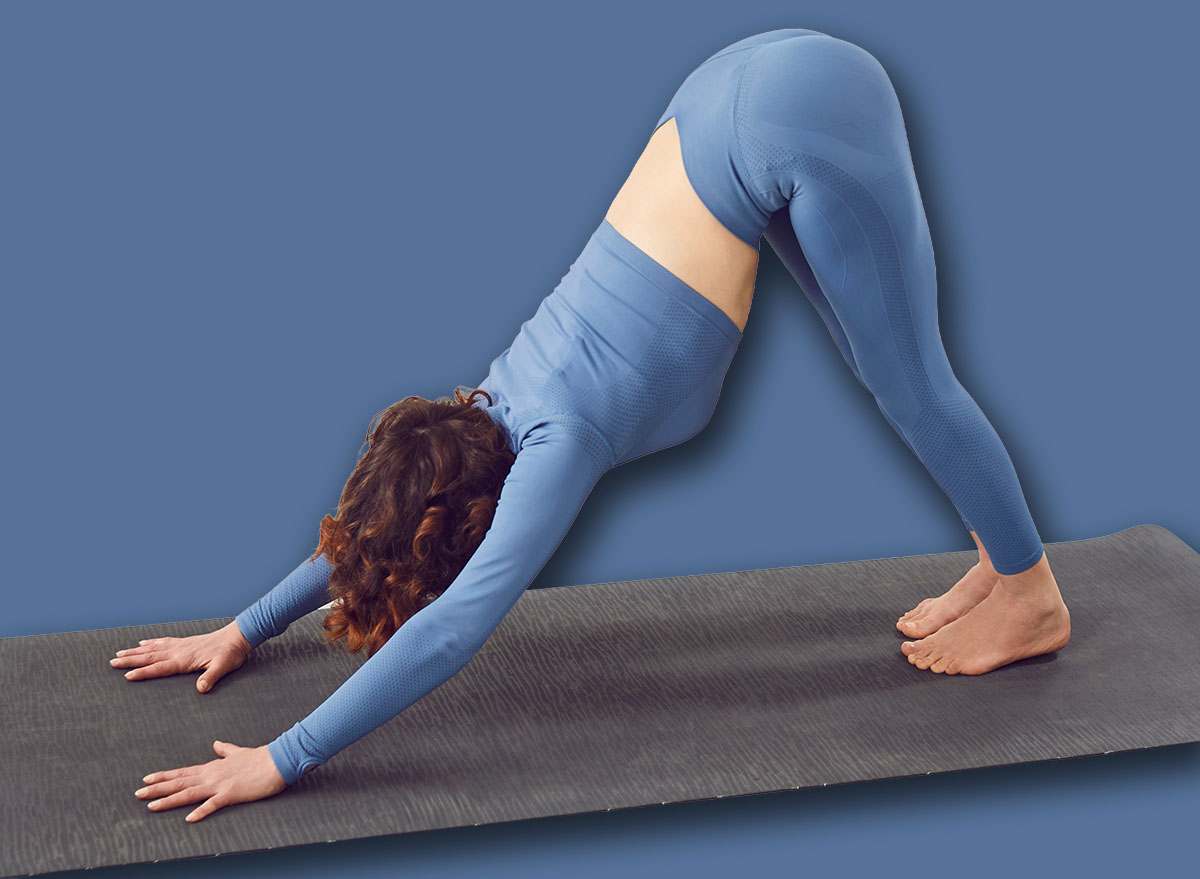
Plank to Down Dog
This dynamic movement works your shoulders, triceps, and core while also stretching your hamstrings and calves. The constant tension throughout the movement builds muscular endurance and creates lean, defined arms rather than just bulk.
How to do it:
- Start in a forearm plank position with your elbows directly under your shoulders. Your body should form a straight line from head to heels.
- Press through your forearms and lift your hips up and back into a downward dog position on your forearms. Your body should form an inverted V.
- Hold this position for a breath, then lower your hips back down to the plank position with control.
Common mistakes to avoid:
- Letting your hips sag in the plank position. Keep your core tight throughout.
- Rushing the movement. This should be slow and controlled—take 2-3 seconds to move between positions.
- Letting your shoulders shrug up toward your ears. Press actively through your forearms.
- If you feel this in your lower back, you’re not engaging your core properly.
To make it easier:
Do this from your hands rather than your forearms. The higher position reduces the intensity significantly.
How Often You Should Train
Three days per week is ideal for most people over 50. This gives you enough training stimulus to see real changes while allowing proper recovery between sessions. Monday, Wednesday, Friday works well for most schedules.
You need at least one full rest day between sessions. Your muscles don’t get stronger during the workout—they get stronger during recovery. If you’re over 50, your recovery capacity isn’t what it used to be. Trying to train every day or even every other day will leave you constantly sore and struggling rather than progressing.
Each session should take 15-20 minutes maximum. Do 3 sets of each exercise with 60-90 seconds rest between sets. For the holds like wall slides, aim for 30-45 seconds. For the movement-based exercises, aim for 8-12 reps. If you can easily do more than 12 reps, you need a harder variation.
If you’re still sore from the previous session when your next training day comes around, take an extra rest day. Soreness means your muscles haven’t fully recovered yet. Training on top of that soreness doesn’t make you progress faster—it just increases your injury risk and leaves you perpetually tired.
Two days per week is the minimum frequency that will produce results. Less than that and you’re just maintaining at best. Four days per week can work for some people, but only if you’re recovering well, sleeping properly, and eating enough protein. Most people over 50 do better with three quality sessions than four mediocre ones.
What Results You Can Expect After 2 Months

In the first couple of weeks, you’ll notice your arms feel firmer when you tense them. This isn’t actual muscle growth yet—it’s your nervous system learning to activate your muscles more efficiently. You’re waking up muscle fibres that haven’t been used properly in years.
By week three or four, other people will start noticing. Your posture will be better because your shoulders are stronger. Your arms will look more defined even when relaxed. You’ll see more shape in your shoulders and the back of your arms will look tighter.
After 6-8 weeks, you should see measurable changes in arm circumference—typically 1-2 centimetres. The back of your arms will be noticeably firmer and that loose, hanging skin will be reduced significantly. Your shoulders will look broader and more defined. Your arms will look proportionally better compared to the rest of your body.
The functional changes are even more impressive. Tasks like pushing open heavy doors, carrying shopping bags, or getting up from the floor will feel dramatically easier. You’ll be able to hold your grandchildren longer without your arms getting tired. You won’t struggle with overhead tasks like putting things on high shelves.
Your confidence will improve too. You’ll stop avoiding short sleeves or worrying about how your arms look in photos. This psychological shift is just as important as the physical changes.
If you’re not seeing these results after 6-8 weeks, something’s wrong. Either your form is off, you’re not actually doing the workouts consistently, or you need to progress to harder variations. Most people dramatically underestimate how hard they need to work. If the exercises feel comfortable, they’re too easy.
The biggest factor in your results is consistency. Three mediocre workouts every single week will beat perfect workouts that only happen twice a month. Show up, do the work, recover properly, and the results will come.