If You Can Complete These 4 Standing Exercises After 60, You’re Fitter Than Most
As we age, everyday movements like getting out of a chair, walking up stairs, or simply maintaining our balance become more challenging. Loss of balance, difficulty transferring weight, and decreased flexibility in the lower body are some of the most common fitness challenges people over 60 face, particularly when it comes to standing exercises. As a Fully Certified STOTT PILATES Instructor and Instructor Trainer, one of the 6 principles we teach our students and clients is lower body mobility and stability. When we think about lower-body mobility and stability, we are thinking about the lower extremity. The lower extremity consists of the muscles and joints that make up the hip, knee, ankle, and foot. These work together to form our lower kinetic chain. For our body to function efficiently, the lower kinetic chain must be able to change positions and transfer loads while controlling this movement with flexibility and balance during static and dynamic tasks. When balance, weight transfer, and flexibility of the lower kinetic chain are lost, then standing exercises become much more challenging, especially as we age. Read on to discover the four standing exercises that will reveal whether your fitness surpasses most of your peers—and what you can do to improve.
Why Standing Exercises Are the True Test of Your Fitness
Standing exercises are particularly effective for measuring overall fitness after 60 because they are very functional to our everyday movements. To get from one place to another, we must stand upright to walk and propel ourselves forward. The use of our lower kinetic chain is what gets us to our destination. Standing exercises are different than seated or floor-based movements because they require many more muscles and a lot more energy to perform. Because you are supporting your full body weight with your lower kinetic chain, more muscles are being recruited, and stabilizers are supporting all the joints of the lower extremity. Your deep core muscles, as well as your erector spinae muscles in the spine, are also recruited to resist gravity and keep you upright. Since local stabilizers use oxygen instead of stored glycogen, you may notice your heart rate increasing during standing exercises to pump more oxygen into those stabilizers.
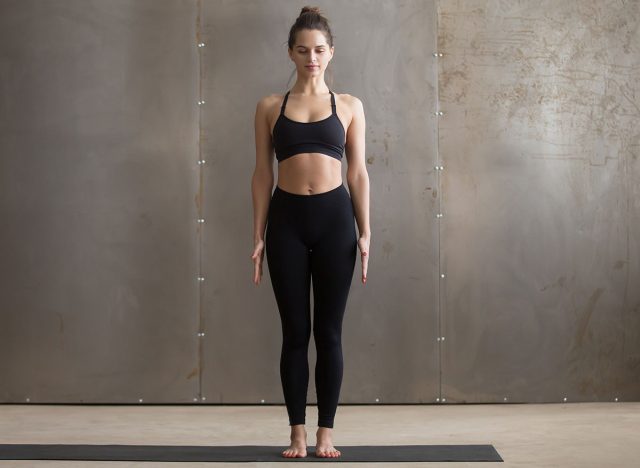
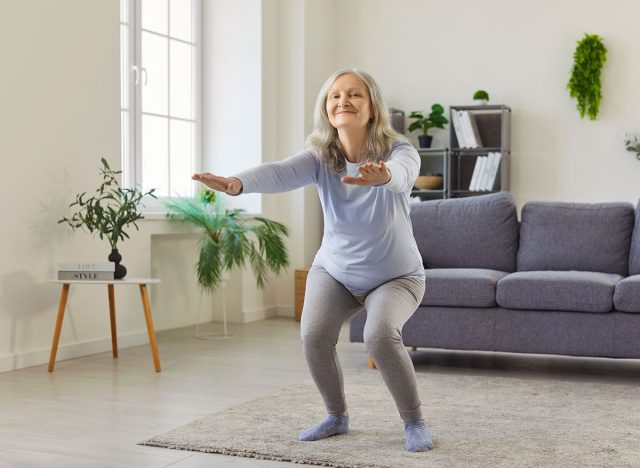
Exercise 1: Bodyweight Squats
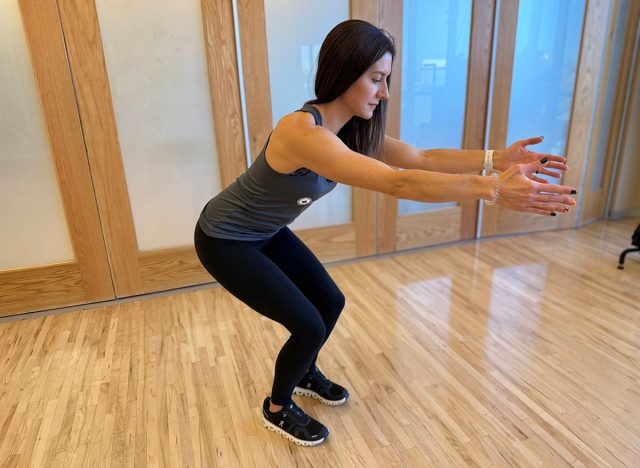
This exercise is very functional for fitness at this age because every time we sit and then stand, we are performing a squat. We must be able to get out of a chair, sit on the toilet, or get out of a car throughout our lifetime. Squats focus on the dynamic alignment of the joints. It is important to perform squats in proper alignment to keep the bones stacked on each other and the forces transferred properly through the joints.
How to do it:
- Standing, pelvis and spine neutral, feet hip-distant apart, arms long by side
- Inhale to maintain torso in neutral as the hips, knees, and ankles flex to squat
- Reach arms forward for counterbalance
- Stick butt out
- Keep core engaged
- Exhale to return to vertical, bringing the arms by the sides
- Complete 12-15 times per set; 3 sets
The benchmark: Start with completing 12-15 reps. If you can successfully complete more than 30 reps in 60 seconds without breaking form, you are in excellent shape over 60.
Common mistakes: People tend to bend their knees before flexing their hips. This can create unwanted pressure in the knees. Keep the core engaged so you don’t feel pain in the lower back. Be sure not to tuck your butt into a posterior tilt. This will also add unwanted pressure to the lower spine and make the exercise less effective for the dynamic stability of the joints in the lower extremity.
Exercise 2: Hip Hinge
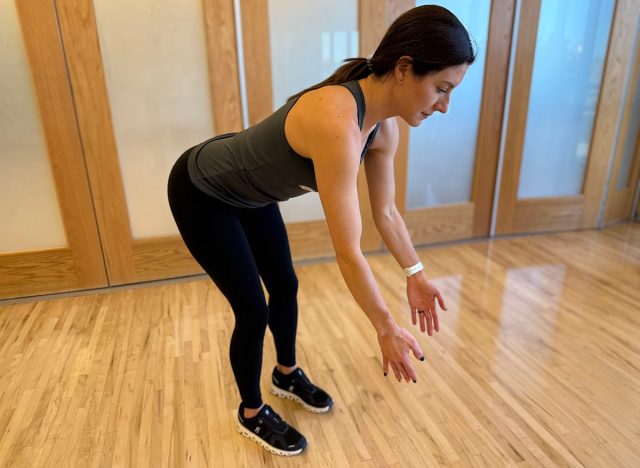
An optimal hip hinge pattern requires flexibility of the hip joints. The pelvis moves on the femurs, while keeping the spine in a neutral position. If the hip joints are tight, the movement will come from the spine or the knees. It is important to keep the hips mobile as we age so we don’t overload the lower back or knees.
How to do it:
- Standing with feet hip distance apart
- Inhale, hinge at the hips to allow the upper body to bow forward while keeping the spine neutral
- Take the eye gaze down the wall to the floor
- Try to keep the pelvis over the heels
- Allow the sit bones to spread apart
- Flex the knees if needed
- Exhale to extend the hip and return to the upright position
The benchmark: Complete 12-15 reps without breaking form. Perform 3 sets.
Common mistakes: Some common mistakes I see with my clients are that they will create movement from their spine rather than moving from the hip joint. Think of the pelvis like a bowl of water. You want to tip the water out of the bowl as the hips hinge. Don’t tuck your butt under. Allow the sit bones to spread apart as the hips hinge forward.
Exercise 3: Standing March
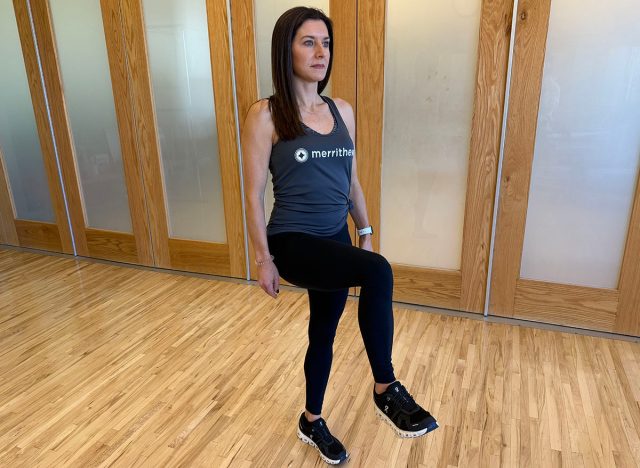
Standing marches challenge balance and weight transfer. As we age, our balance seems to go out the window. It is important to incorporate daily balance exercises to be able to transfer loads across our lower body. Walking is a constant balancing act. We must challenge our bodies to keep our balance from diminishing as we age. Balancing one leg to another in a marching pattern is a great way to keep our balance from failing us.
How to do it:
- Stand with feet hip-distance apart
- Inhale prepare
- Exhale, flex one knee and hip, bringing the foot off the floor and the knee toward the torso
- Inhale replace the foot on the floor
- Keep core engaged and spine neutral
- Alternate side to side
- Move slowly
The benchmark: March in place for 30-60 seconds. If you can complete it without having to hold on to something for balance, you are fitter than most.
Common mistakes: Try to keep the feet directly under the hips and replace them where they started. Sometimes I will see my clients march down the room instead of staying in place. Try to keep your knees and feet high and don’t move too fast. See if you can hold the knee up for one second before switching feet.
Exercise 4: Heel-to-Toe Walk
This is one of my favorite exercises to have my clients perform. Think of the standard field sobriety test. This exercise is very humbling for my clients over the age of 60. It seems so simple, but it proves fast that it is not when we’re older. If you can perform this exercise at 60 and beyond, you possess great fitness.
How to do it:
- Standing, arms at side
- Walk one foot in front of the other
- Place the heel of the front foot on the toes of the back foot
- Imagine you are walking down an imaginary line
- Keep the eye gaze up
The benchmark: Complete 20-30 steps in each direction. For an added challenge, try this exercise with the eyes closed.
Common mistakes: One of the biggest mistakes I see is my clients looking down at their feet. This exercise is not as easy as it seems. Be sure to keep the spine neutral and stand tall. Don’t allow yourself to cheat by looking at your feet or not actually touching heel to toe. Don’t hold your breath.
What Your Fitness Level Says About Your Longevity

Seventy percent of the clients that I work with are over the age of 60. These are some of my favorite exercises that I give my clients to perform. I often give these exercises as homework to clients to perform at home. These exercises are great ways to challenge balance, weight transfer, and flexibility of the lower body. We must be able to have these movements available to move through our day-to-day tasks. If you can complete these exercises, then you are on your way to a healthy, long life. A strong balance will keep you from falling. The ability to transfer weight from one leg to another will keep you moving to where you want to go. The flexibility in the lower body will allow you to get out of a chair easily and walk up stairs with ease.
How to Build Up If You’re Struggling
If you find these exercises challenging, then start with a smaller range of motion in the squats and hip hinges. Build your strength and flexibility by shortening the range of motion. For balance exercises, you can always hold on to a non-moving surface like a high-backed chair or banister. Shorten the reps or hold times if necessary. Continue to practice, and you will notice improvements.