The 7-Minute Standing Routine That Shrinks Hip Dip Fat After 45, According to a Trainer
After more than 35 years as a personal trainer — and as director and fitness educator at TRAINFITNESS — I’ve worked with thousands of women over 45, and one of the most common concerns I hear is about hip dips and the fat that sits around them. This area gets a lot of attention on social media, but most of what you’ll read about targeting it is wrong, and the approaches people take rarely work. Here’s what actually does.
Why Hip Dip Fat Is So Stubborn

Hip dips are indentations between your hip bone and the top of your thigh. They’re completely normal and their visibility has nothing to do with fitness level. What people call “hip dip fat” is actually fat that sits around this area and becomes more noticeable as we age.
After 45, hormonal changes during perimenopause and menopause shift where your body stores fat. Oestrogen levels drop and your body starts storing more fat around your hips, thighs and lower abdomen. The fat cells in these areas also become more resistant to being broken down. Your metabolism slows by about 2–8% per decade after 40, which means your body burns fewer calories at rest.
The biggest mistake people make is thinking they can spot reduce this area. You cannot target fat loss in one specific part of your body. Doing hundreds of side leg lifts or hip abductions won’t burn the fat around your hip dips. Your body decides where it loses fat, and it’s largely determined by genetics and hormones.
The second mistake is focusing only on cardio. While cardio burns calories during the session, it doesn’t do much after you’ve finished. Women over 45 need to build and maintain muscle mass because we lose about 3–8% of our muscle per decade after 30. Less muscle means a slower metabolism, which means fewer calories burned throughout the day.
The third mistake is doing exercises lying down. Most floor exercises for hips don’t actually create enough resistance to stimulate real change. They might make the area feel like it’s working, but they’re not challenging enough to build muscle or burn significant calories.
Why Standing Beats Floor Work
Standing exercises work your entire body at once. When you’re on the floor doing leg lifts, you’re only moving one limb. When you’re standing, your core has to stabilise your torso, your supporting leg has to hold your weight, and your working leg has to move against gravity. This burns more calories and builds more muscle.
Standing exercises also improve your functional fitness. We don’t spend our daily lives on the floor doing leg lifts. We stand, we walk, we climb stairs, we reach for things. Training in standing positions makes you stronger for the movements you actually do, which means better balance and more confidence in daily activities.
For women over 45, standing work is also easier on your joints. Getting down and up from the floor repeatedly can be hard on knees and hips. Standing exercises let you work just as hard without that stress.
Standing routines build bone density better than floor work, too. Weight-bearing exercises send signals to your bones to stay strong — especially important after 45 when bone density naturally declines.
And standing exercises can be progressed more easily. You can add weights, change your stance width, increase your range of motion or adjust your speed. Floor exercises are much harder to increase in complexity once you’ve mastered them.
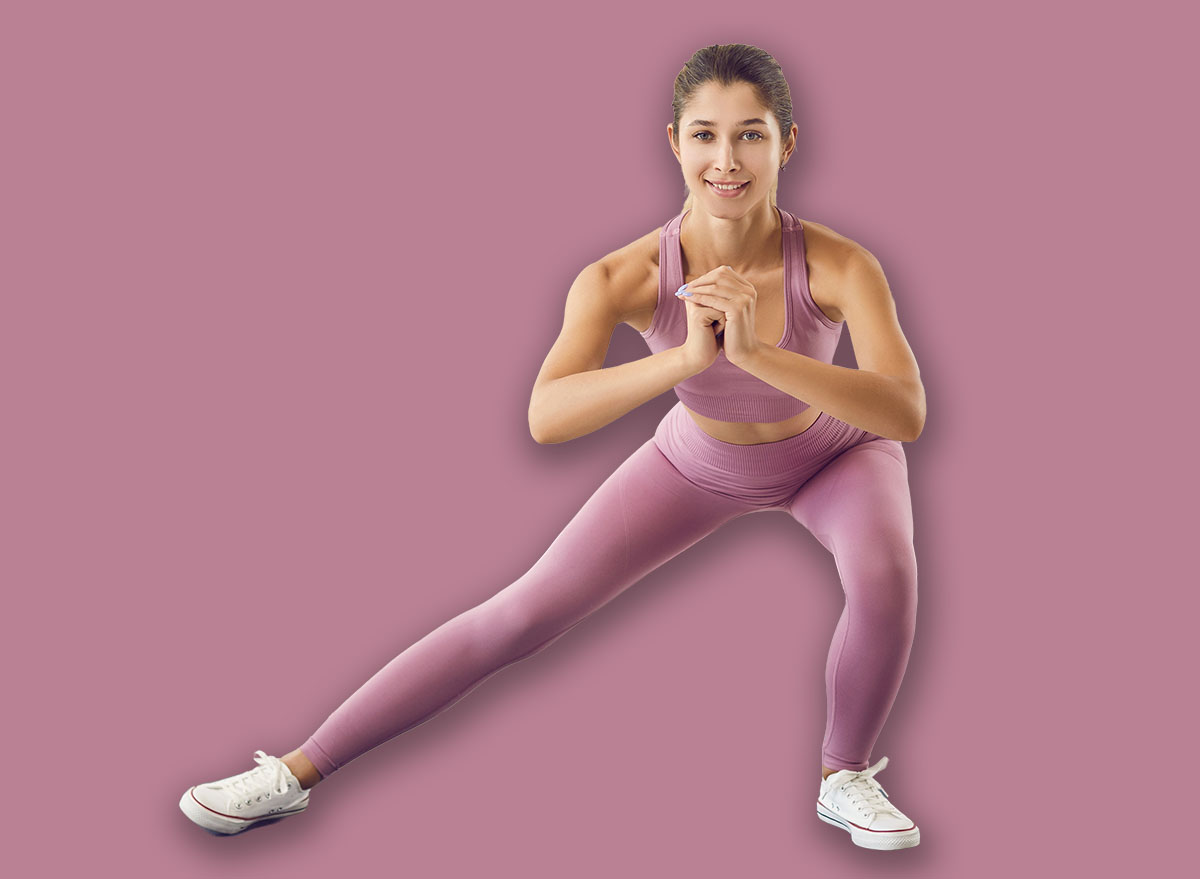
Side Step Squats
This exercise works your glutes, outer thighs and core while burning calories. The lateral movement targets the muscles around your hips, and the squat position engages your entire lower body.
Muscles Trained: Glutes, outer thighs, core
How to Do It:
- Stand with feet hip-width apart
- Step your right foot out to the side about two feet
- Bend both knees and push your hips back like you’re sitting into a chair
- Keep your chest up and your weight in your heels
- Push back to standing and bring your feet together
- Repeat on the left side, alternating for 90 seconds
Avoid These Mistakes:
- Don’t let your knees collapse inward — they should track in the same direction as your toes
- Don’t just drop straight down — your hips should move back and down, not just down
- Don’t rush through it — slow down and control the movement; you should feel your outer thighs and glutes working.
Standing Side Leg Raises with Pulse
This exercise directly works the muscles on the outside of your hip and thigh. The pulse at the top keeps the muscle under tension for longer, which builds strength and burns more calories.
Muscles Trained: Hip abductors, outer thighs
How to Do It:
- Stand tall with your feet together
- Shift your weight onto your left leg
- Lift your right leg out to the side about 12 inches off the ground
- At the top, pulse up and down in a small range (about 2 inches) for three pulses
- Lower your leg back down with control
- Do 45 seconds on each side
Avoid These Mistakes:
- Don’t lift your leg too high — this causes you to lean your torso to the opposite side, taking the work out of the target muscles and putting it into your lower back
- Don’t swing the leg — the movement should be controlled both up and down
- If you’re losing balance, hold onto a chair or wall with one hand.
Curtsy Lunges
Curtsy lunges work your glutes from a different angle than regular lunges. They also challenge your balance and work your inner and outer thighs at the same time.
Muscles Trained: Glutes, inner thighs, outer thighs
How to Do It:
- Stand with feet hip-width apart
- Step your right foot back and across behind your left leg like you’re doing a curtsy
- Bend both knees and lower down until your back knee is close to the floor
- Keep your front knee over your front ankle
- Push through your front heel to stand back up
- Alternate legs for 90 seconds
Avoid These Mistakes:
- Don’t let your front knee cave inward — keep it aligned with your toes
- Don’t step back too narrowly — the wider you step, the more you’ll work your glutes
- Don’t lean forward — keep your chest up and your core engaged
- If you’re struggling with balance, reduce your range of motion or hold onto something until you build strength.
Lateral Step Ups
This exercise combines strength and cardio. It works your glutes, thighs and core while getting your heart rate up. The stepping motion also improves your functional fitness for stairs.
Muscles Trained: Glutes, quads, hamstrings, core
How to Do It:
- Stand next to a sturdy step or box about knee height
- Place your right foot on the step
- Push through your right heel to lift your body up onto the step
- Bring your left foot up to meet your right
- Step back down with your left foot first, then your right
- Do 45 seconds leading with your right leg, then 45 seconds leading with your left
Avoid These Mistakes:
- Don’t push off with your bottom foot — the work should come from the leg on the step, not the leg on the ground
- Don’t use momentum — control the movement both up and down
- Don’t start with a step that’s too high — begin lower and progress as you get stronger; if your knee comes past your toes at the bottom, the step is too high.
Standing Hip Circles
This exercise works your hips through their full range of motion. It strengthens the muscles around your hip joint and improves mobility, which tends to decrease after 45.
Muscles Trained: Hip flexors, glutes, hip abductors and adductors
How to Do It:
- Stand on your left leg with your right leg lifted slightly off the ground
- Draw circles in the air with your right knee, making them as large as you can control
- Do 45 seconds clockwise, then 45 seconds anticlockwise
- Switch legs
Avoid These Mistakes:
- Don’t make the circles too small — challenge yourself to make them larger while keeping your torso stable
- Don’t let your hips shift around — your standing hip should stay stacked over your ankle
- Don’t hold your breath — keep breathing normally throughout
- Hold onto a wall or chair if you need support for balance.
How to Structure Your Routine
Do this routine as a circuit, moving from one exercise straight into the next with no rest between exercises. This keeps your heart rate up and burns more calories in a short time.
Start with a brief warmup: march in place for 30 seconds, do some arm circles and a few gentle hip rotations. This gets blood flowing to your muscles and reduces injury risk.
Work through all five exercises in order. The total work time is 7.5 minutes. After you finish the last exercise, walk around for 30 seconds to a minute to bring your heart rate down gradually. Don’t sit down immediately.
Do this routine 4–5 times per week for the best results. Your body needs rest days to recover and build muscle. Three times per week is the minimum to see changes, but more frequent sessions will give you faster results.
You can do this routine on its own or add it to the end of a walk. It works well as a finisher after cardio, or on days when you’re doing upper body work.
After about four weeks of consistent training, progress the routine. Add light ankle weights or small dumbbells, increase your range of motion on each exercise, move more slowly to increase time under tension, or add an extra round of the circuit if you have time.
What Results to Expect
In the first two weeks, you won’t notice any visual results — but you will feel the difference. The workouts will become easier, your balance will improve, and you’ll feel more energised throughout the day. That’s how you’ll know your muscles are getting stronger.
After a month, you might notice your pants sitting slightly better on your hips and thighs. The area will feel a bit tighter when you press on it. Going up the stairs or getting in and out of your car will probably become easier, and your posture will likely improve without you even noticing.
After two months, other people will probably start to notice that you look different. Your lower body will be taking shape, your hips and thighs will be more toned, and the fat around the hip dips will feel tighter. With consistent exercise and managed nutrition, some fat loss around the area is realistic.
After three months, you’ll start to notice an actual change in muscle tone. Your legs will be stronger, your balance will have improved markedly, and the muscles around your hips will be strong enough to make the hip dips less noticeable — even if they’re still there.
Keep in mind that hip dips are part of your bone structure. Results will vary from woman to woman. The goal isn’t to remove a part of your anatomy that’s meant to be there — it’s to strengthen your muscles and reduce the fat around the area. Some women will notice significant results, others moderate results. Either way, if you’re stronger and healthier than when you started, that’s a real win.
The Nutrition Factor

You cannot out-exercise a bad diet. This 7-minute workout burns around 50–70 calories — less than a small banana. Exercise will make you more muscular and fitter, but it won’t remove fat on its own. To lose fat around your hip dips, or anywhere else, you need to be in a calorie deficit. That means consuming slightly fewer calories than your body uses each day. A deficit of 300–500 calories per day will result in a slow and sustainable loss of around 0.5–1lb per week.
Once you’re over 45, you need more protein. Aim for around 0.8–1g of protein per lb of body weight per day. Protein helps you maintain or even build muscle, which keeps your metabolism higher. It also keeps you full, making it easier to stay in a deficit. Good sources include lean meats, fish, eggs, Greek yoghurt, cottage cheese and legumes.
Cut down on processed foods and added sugars. They provide a lot of calories for very little nutrition and they won’t keep you full. Focus instead on whole foods — vegetables, fruits, whole grains, lean proteins and healthy fats. They provide more nutrition per calorie and will keep your energy levels more stable.
Drink plenty of water. Sometimes you can feel hungry when you’re actually just thirsty. Aim for around 2 litres per day, more if you’re exercising or it’s hot.
Don’t cut your calories too low. This will slow your metabolism, cause you to lose muscle alongside fat, and leave you feeling tired and irritable — which you won’t be able to sustain long term. A moderate deficit you can stick to is always better than a severe one you can’t.
Fat loss isn’t always linear. Some weeks you’ll notice changes and some weeks you won’t. All that matters is the trend over months, not over any given week. Consistency is everything — with both exercise and nutrition.