4 Morning Posture Routines That Improve Alignment Better Than Back Workouts After 45
If you’re over 45, you’ve probably noticed your posture isn’t what it used to be. Sitting at desks, on couches, and in cars takes its toll over the years. Common postural challenges that we start to see after 45 are generally a combination of a loss of pliability of some key muscle groups, including the abdominal and the psoas. There’s also excessive kyphosis, which means a rounding of the upper back, generally due to poor postural habits. We can also start to see some postural issues due to a lack of use of the vestibular system. The vestibular system is just a fancy way of saying your inner ear balance system. This system is generally challenged by either closing our eyes to eliminate the visual assistance or by training on an unsteady surface. As we age, we tend to do very little in the way of activities that stimulate the vestibular system. Here are four simple morning routines that can help you stand taller and feel better in just minutes a day.
Why Morning Is the Best Time To Work on Your Posture

The morning can be a great time to work on posture and alignment, largely due to the fact that you are well rested and have the time to do the exercises. Generally speaking, the longer we wait the less likely we are to do the activities we need.
The morning is also a great time for posture and alignment activities because it sets the bar for the day. Meaning, if you start your day focusing on your posture, you’re more likely to focus on it the rest of the day.
Posture exercises should stimulate your proprioceptors, which help you build your postural awareness. So, by working on your proprioceptors in the morning, you are more likely to keep them active throughout the day.
Additionally, overnight, our intervertebral discs actually imbibe fluid, meaning that your posture is generally best first thing in the morning.
Why Posture Routines Work Better Than Back Workouts

A dedicated posture routine can be better than back strengthening because it covers more of the systems responsible for good posture. These systems include your proprioceptive system and your vestibular system.
A specific posture program also helps more with general postural awareness than back strengthening exercises alone. That’s not to say back strengthening exercises are not valuable for good posture, but good posture requires working all the systems involved.
The T8/T9 ELDOA
This is a postural exercise designed to strengthen all of the spinal muscles while creating space between the eighth and ninth thoracic vertebrae. This helps us counteract the general slump posture that we are in throughout the day while sitting at our desk, on our couch, and in our vehicles. Plus, ELDOA exercises are great when you are away from home.
How to perform:
- Begin by facing the mirror or being sideways to the mirror. Each time you try the exercise, try a different perspective in the mirror while sitting. Bend your knees and keep your feet on the floor.
- If you can maintain a straight spine, slowly reach both arms out in front of you.
- Straighten your elbows and rotate your arms so your fingers face the floor.
- If you can maintain that position, slowly bring both arms up over your head.
- Push your palms to the ceiling, allowing your shoulder blades to come up towards your ears.
- Maintain the posture for one minute, making sure to follow all the following cues:
- Keep your chin tucked and your eyes looking one to two feet in front of you at the floor.
- Breathe from your belly, keeping your abs relaxed.
- Keep the fingers spread, the wrists bent back, elbows straight, and arms rotated open, keeping the fingertips pointed down. (Think of Spider-Man shooting a web for a reference.)
- Continue to push your arms and shoulder blades up toward the ceiling.
- Very slowly, unwind the posture one piece at a time until you return to the starting position. From there, go ahead and relax the rest of your spine.
Cues to check in the mirror:
- Make sure you’re keeping your spine as straight as possible.
- Make sure your arm position is symmetrical.
- Make sure that your ear, shoulder, and hip stay in line at all times.
- Make sure to breathe from your belly.
Duration: One set for 60 seconds. The 60 seconds begins when you’re in the full posture, not as you’re working your way into it.
Avoid these mistakes: Don’t hold your breath, let your spine round, or clench your jaw. Most importantly, don’t come out of the posture too quickly.
The Myofascial Psoas Stretch
The psoas muscle is the only muscle that connects the spine directly to the leg. The psoas muscle attaches not only directly to the vertebrae, but also into the discs themselves.
Tightness or weakness in this muscle can lead to a side bending and a twisting of the spine. It can also lead to a pulling and weakening of the discs themselves, which forces us to change our posture.
The fascia or connective tissue of this muscle connects to all of the abdominal and pelvic floor organs. This again means that undue tension or weakness in this muscle affects the way the organs sit, which dramatically affects our posture.
How to perform:
- Begin in a kneeling position with enough distance between your front heel and your back knee that you can feel a nice stretch in the front of the back hip.
- Take the shin on the back leg and rotate it out slightly. If you’re looking in a mirror, you should be able to see the back foot outside of the back hip.
- Lean your torso forward, keeping your back as flat as you can. Don’t be afraid to round your low back a little bit.
- Take the same arm as the hip that is back and reach it out in front of you. You’re trying to create a stretch from the palm all the way down to that back hip.
Avoid these mistakes: Don’t arch your back, and make sure you’re leaning forward far enough. Keep breathing throughout the stretch.
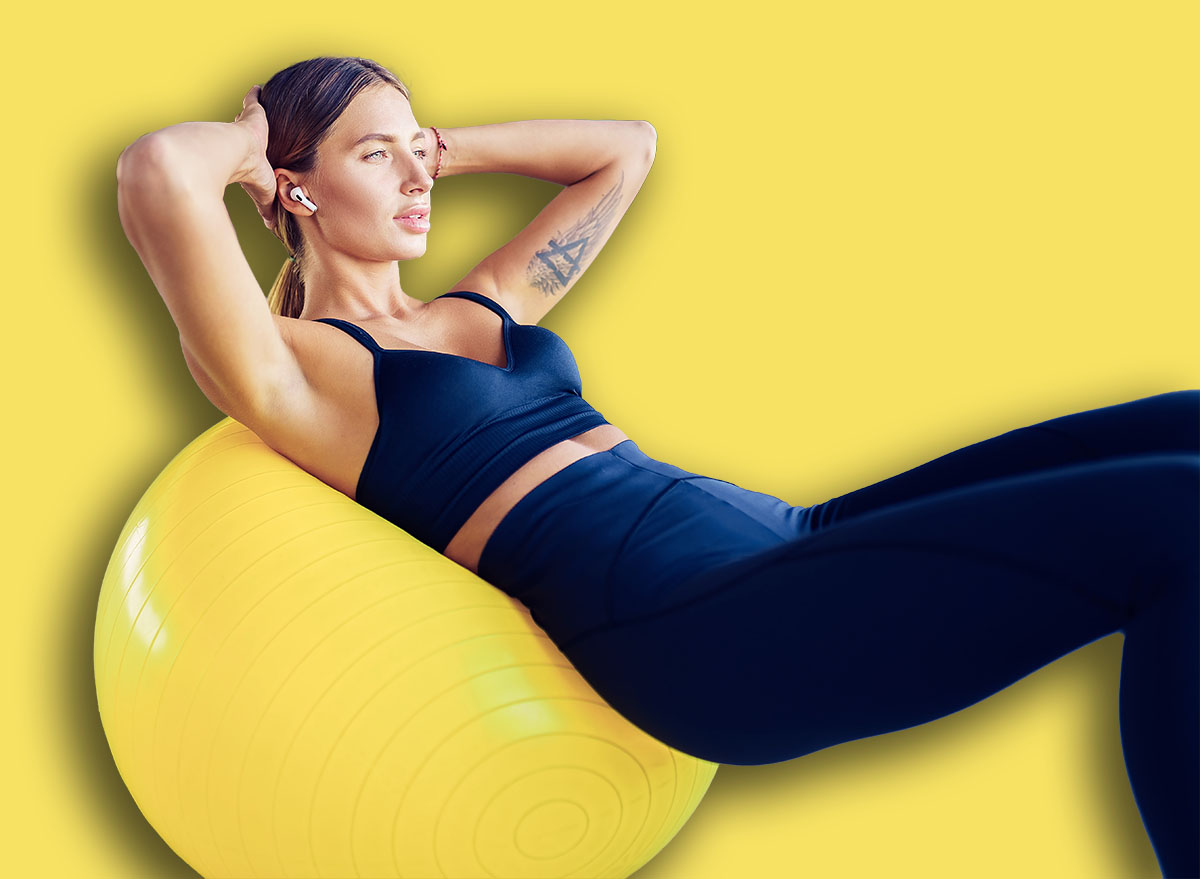
The Swiss Ball Abdominal Stretch
When we spend a majority of our time sitting, there tends to be a shortening and tightening of the abdominal muscles. This is important for our posture as the abdominal muscles attach to the front of the ribs. When these muscles get tight, it tends to pull us into a slump posture.
This not only negatively affects our posture, it also limits the depth of our breath, along with providing unneeded compression of the digestive and respiratory organs. This can also lead to a tightening of the diaphragm, which again inhibits proper breathing function.
It’s also important to remember that short, shallow breathing caused by tight abdominals leads to a higher output of stress hormones, which can lead to higher levels of anxiety, which also have a negative effect on our posture. Stretching your abdominal muscles has benefits far beyond postural improvement.
How to perform:
- Start by sitting on an exercise ball and slowly walk your feet out in front of you as you lay back over the ball.
- In the early stages, you’re generally going to want to support your head with your hands as you arch your back over the ball.
- If you can comfortably lower yourself enough to where your head is supported on the ball, then you can reach your arms overhead, keeping your fingertips on the floor.
- Once you’re in the full stretch, stay there somewhere between 30 to 60 seconds.
- Try to take nice, big, full breaths where you feel your ribs expand and your belly get bigger with each inhale.
- When you’re ready to work your way out of the stretch, support your head with your hands again and gently lift your head as you curl your way up on the ball and walk your feet back to a seated position.
Avoid these mistakes: Don’t try to create too big of a stretch too early—you could end up with neck pain. If you feel dizzy in the slightest, come out of the exercise immediately to avoid any compression of your cervical arteries.
Have someone there to help support the ball and maybe even support your head until you can comfortably do the stretch without assistance.
The 4-Point Swiss Ball Balance
This exercise helps us focus on the vestibular system. As we mentioned earlier, this is your inner ear balance. The vestibular system is stimulated by either closing your eyes or exercising on an unstable surface. As our vestibular system improves, our general posture improves because we are able to hold our head upright on the horizon.
How to perform:
- Grab a Swiss ball and place your hands on top of the ball, maybe off to the side slightly.
- Bring one shin up on the ball and see if you can balance from there.
- If you can balance there, bring your other leg off the floor so that both hands and both shins are on the ball.
- Once you’ve achieved this position, simply try to maintain a relatively flat to neutral spine and adjust to the movements of the ball.
Avoid these mistakes: Don’t try to get on the ball too quickly, and don’t hold your breath. Make sure you use a spotter when you’re first learning this exercise.
What Results You Can Expect in 4 to 6 Weeks
If you choose to do all the exercises in the routine, you can knock it out in generally 8 to 10 minutes. If you don’t have that time, simply pick one exercise each day and rotate them. Each exercise should only take about two minutes.
These also serve as a great warm-up or cool down for your regular exercise program. If you have trouble remembering to do these things in the morning, you can always set an alarm on your phone as a reminder to try to stick to your goals of better posture.
I always encourage my clients to take before and after pictures. Within 4 to 6 weeks, you should notice a dramatic improvement in your posture. You should notice such things as your head not being pushed forward, less rounding of your upper back, easier breathing, and a better overall mood and demeanor.