5 Morning Exercises That Trim Belly Overhang Faster Than Weight Training After 50
As a personal trainer and fitness educator, I’ve coached thousands of people over the age of 50, and the “belly overhang” comes up in nearly every consultation. It’s one of the most common concerns I hear — and the frustration behind it is completely valid. This isn’t just about vanity. The fat that accumulates around the midsection after 50 is driven by real physiological shifts: declining metabolism, hormonal changes, and muscle loss that compound on each other in ways that make your usual strategies stop working. The good news is that a focused morning routine — one that requires no gym, no equipment, and just 12-15 minutes — can start reversing this. Here are five exercises that do more for belly overhang than jumping straight into heavy weights.
Why Belly Fat Gets So Stubborn After 50

Your metabolism declines by around 2-3% every decade past 30. By age 50, your daily resting metabolic rate is roughly 200-300 calories lower than it was at 30, even if you’re doing the same activities. Most people aren’t doing the same activities, so the gap is even wider.
Hormone balance shifts. In women, estrogen levels decline during menopause, which moves primary fat storage from the hips and thighs to the abdomen. In men, testosterone declines gradually after 30 at around 1% per year. Lower testosterone means lower muscle mass, a slower metabolism, and a greater tendency to store visceral fat around your organs.
Muscle mass itself declines by 3-8% every decade past 30, with acceleration after 50. Less muscle means a slower resting metabolism because muscle tissue burns calories even at rest. When you lose it, your body doesn’t process food as efficiently — so more of it gets stored as fat.
Cortisol levels tend to rise with age, especially if you’re dealing with chronic stress or sleep issues (both common past 50). Higher cortisol encourages fat storage around the midsection. Insulin sensitivity also declines — your cells don’t respond to insulin as well, so your body produces more of it, which promotes fat storage and makes accessing stored fat for energy harder.
All of this creates a compounding effect. Your metabolism is lower, your body preferentially stores fat in your abdomen, and the strategies you used at 35 simply don’t work the same way anymore.
Why Morning Workouts Work Better

Morning exercise isn’t inherently superior to evening training from a pure calorie-burning standpoint. What makes it work so well for people over 50 is consistency — and morning routines stick far better.
I’ve tracked this with clients for years. People who train in the morning complete around 80-85% of their planned sessions. People who schedule evening workouts? More like 40-50%. Life gets in the way. Work runs late, you’re tired, something comes up, you convince yourself you’ll do it tomorrow.
Morning exercise also sets up your metabolism differently for the rest of the day. When you move first thing, you increase insulin sensitivity for the next 12-24 hours. Your body handles the food you eat more effectively — storing less as fat, using more for energy.
There’s a psychological component too. When you’ve already exercised by 7 am, you’ve accomplished something before most people have had breakfast. My morning exercisers consistently make better food choices and move more throughout the day compared to people who train later.
As for heavy weight training, it has its place, and it matters for building muscle and strength. But for someone over 50 who hasn’t been consistently active, jumping straight into heavy weights creates problems. The injury risk is higher when you’re learning complex movement patterns and loading them heavily at the same time. Your joints need time to adapt. Your nervous system needs to relearn how to activate muscles that may have been underused for years.
Starting with bodyweight and moderate resistance work gives your body time to adapt. You build movement quality, develop stability, and create a foundation that makes heavier training safer when you’re ready. Most people need 4-8 weeks of consistent movement before their bodies are prepared for serious loading.
Dead Bug
Dead bugs train your core to stabilize while your limbs move independently. This is exactly what your core needs to do during daily activities. When your core works properly, it reduces the forward pelvic tilt that makes belly overhang appear worse, and it activates the deep abdominal muscles that provide genuine waist support.
Muscles Trained: Deep abdominals (transverse abdominis), rectus abdominis, hip flexors, lower back stabilizers
How to Do It:
- Lie on your back with your arms extended straight up toward the ceiling
- Lift your legs so your knees are bent at 90 degrees, thighs vertical
- Press your lower back flat against the floor by engaging your abs
- Slowly lower your right arm overhead while extending your left leg straight, hovering a few inches off the floor
- Keep your back flat the entire time
- Return to the start and repeat on the opposite side
Avoid These Mistakes:
- Don’t let your lower back arch off the floor as you extend your limbs — this means your hip flexors are taking over; if it happens, don’t extend your leg as far or keep your knee bent as you lower it
- Don’t rush — dead bugs should be slow and controlled; moving quickly eliminates the benefit
Modifications: If the full version is too challenging, keep both knees bent and alternate lowering your heels toward the floor without straightening your legs. You can also start with arms only — alternate lowering arms overhead while keeping both knees bent and feet flat on the floor.
Recommended Sets and Reps: 8-10 reps per side, 2-3 rounds.
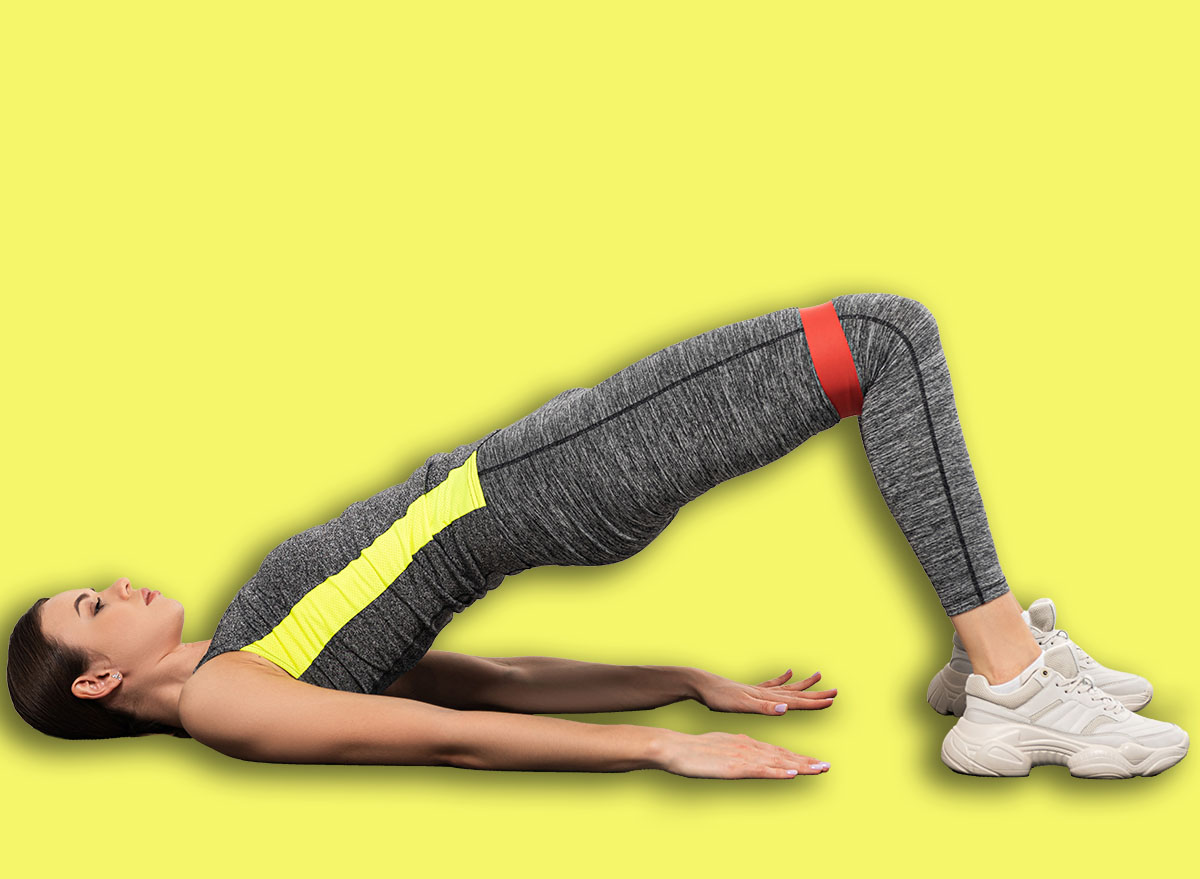
Glute Bridge
Weak glutes contribute to anterior pelvic tilt and lower back problems, both of which make your belly stick out more, regardless of how much fat is actually there. Strong glutes also burn significant calories and help stabilize your pelvis during walking and standing.
Muscles Trained: Glutes, hamstrings, lower back stabilizers, core
How to Do It:
- Lie on your back with knees bent and feet flat on the floor, hip-width apart
- Position your feet close enough that you can graze your heels with your fingertips
- Press through your heels and lift your hips until your body forms a straight line from knees to shoulders
- Squeeze your glutes hard at the top
- Hold for 2 seconds
- Lower back down with control
Avoid These Mistakes:
- Don’t arch your back at the top — think about tilting your pelvis slightly toward your ribs as you lift; arching means you’re compensating with your lower back instead of using your glutes
- Don’t push through your toes — keep your weight in your heels throughout; toe pressure shifts the work into your quads and calves
- Don’t skip the squeeze at the top — that’s where the glutes actually work hardest
Modifications: If you have knee issues, place your feet slightly further from your body. If you have lower back problems, don’t lift as high initially — focus on the glute squeeze even if your hips only come up a few inches. For more challenge, hold a weight across your hips or progress to single-leg bridges.
Recommended Sets and Reps: 12-15 reps, 2-3 rounds.
Modified Plank
Planks build genuine core stability that transfers directly to better posture and a flatter-looking midsection. They work the entire front of your core plus your shoulder and back stabilizers. Unlike crunches, they don’t repeatedly flex your spine, which makes them significantly safer for people with back issues.
Muscles Trained: Transverse abdominis, rectus abdominis, obliques, shoulder stabilizers, back extensors
How to Do It:
- Start on your hands and knees
- Walk your hands forward until your body forms a straight line from head to knees (not head to heels yet)
- Position your hands directly under your shoulders
- Pull your belly button toward your spine
- Keep your neck neutral by looking at the floor a few inches in front of your hands
- Hold while breathing normally
- Start with 20-30 seconds and build from there
Avoid These Mistakes:
- Don’t let your hips sag toward the floor — if this happens, you’re holding too long; reduce the time
- Don’t hold your breath — breathing is part of core stability; if you can’t breathe normally, the position is too challenging
- Don’t push your hips up in the air — it makes it easier but defeats the purpose; your body should form a straight line
Modifications: Do the plank against a wall if the floor version is too difficult — stand facing a wall, place your hands flat at shoulder height, step your feet back, and hold. For more challenge, progress to a full plank on your toes or add shoulder taps (lift one hand to tap the opposite shoulder, alternating).
Recommended Sets and Reps: 20-30 second holds, 2-3 rounds.
Standing March with Rotation
This one combines lower body work with core rotation — which is how your body actually moves in real life. It activates your obliques, improves hip mobility, and builds the dynamic stability you need for walking and climbing stairs.
Muscles Trained: Obliques, hip flexors, glutes, core stabilizers
How to Do It:
- Stand with feet hip-width apart
- Lift your right knee up toward your chest
- As your knee comes up, rotate your torso to the right
- Bring your left elbow across toward your right knee (they don’t need to touch)
- Return to standing and repeat on the other side
- Alternate for 20 reps total (10 per side)
Avoid These Mistakes:
- Don’t lean back as you lift your knee — stand tall and think about pulling your knee up with your abs, not your hip flexors
- Don’t rotate your hips — the rotation should happen above your waist; your pelvis stays relatively still
- Don’t rush — slow, controlled marches with deliberate rotation work far better than fast, sloppy ones
Modifications: If balance is an issue, hold onto a chair or wall with one hand. If you can’t lift your knee to hip height, lift it as high as you comfortably can — the effort of lifting combined with the rotation is what matters. For more challenge, hold light weights or pause at the top of each march.
Recommended Sets and Reps: 20 reps total (10 per side), 2-3 rounds.
Bodyweight Squat
Squats are one of the best exercises for total body strength and fat burning. They work your largest muscle groups — quads, glutes, hamstrings — which means they burn significant calories and boost your metabolism. They also improve mobility and make daily activities like getting out of chairs much easier.
Muscles Trained: Quadriceps, glutes, hamstrings, calves, core
How to Do It:
- Stand with feet slightly wider than hip-width, toes pointed slightly out
- Keep your chest up and core engaged
- Begin by pushing your hips back as if sitting into a chair
- Lower until your thighs are roughly parallel to the floor, or as low as you comfortably can
- Keep your knees tracking over your toes, not caving inward
- Push through your heels to stand back up
Avoid These Mistakes:
- Don’t let your knees cave inward — think about pushing your knees slightly outward as you squat; caving puts stress on your joints and means your glutes aren’t working
- Don’t come up onto your toes — your weight should stay in your heels and midfoot throughout; if you’re rising onto your toes, you’re either leaning too far forward or need to work on ankle mobility
- Don’t round your back — your chest should stay proud and your spine neutral; if your back rounds, you’re going lower than your current mobility allows
Modifications: If you can’t squat to parallel, squat onto a chair or bench — lower yourself down until you’re just touching it, then stand back up. This gives you a depth target and reinforces proper form. Hold onto a doorframe or countertop if balance is an issue. For more challenge, pause at the bottom for 2-3 seconds before standing, or hold light weights.
Recommended Sets and Reps: 10-12 reps, 2-3 rounds.
How to Structure the Routine

Once you know the exercises, the full routine takes 12-15 minutes. Here’s how to put it together:
Warm-Up (2 minutes)
- 30 seconds of marching in place
- 30 seconds of arm circles
- 30 seconds of gentle trunk rotations
- 30 seconds of hip circles (hands on hips, rotate in circles)
Main Circuit (8-10 minutes)
- Dead bugs: 8-10 reps per side
- Glute bridges: 12-15 reps
- Modified plank: 20-30 seconds
- Standing march with rotation: 20 reps total
- Bodyweight squats: 10-12 reps
Rest 60 seconds, then repeat the circuit 2-3 times depending on your fitness level.
Cool-Down (2 minutes)
- Child’s pose: 30 seconds
- Cat-cow stretches: 30 seconds
- Standing quad stretch: 30 seconds
- Gentle torso twist: 30 seconds
Aim for 4-5 days per week. If you’re currently doing nothing, start with 3 days — Monday, Wednesday, Friday for the first two weeks. Once that feels manageable, add a fourth day, then a fifth if you want to.
Don’t add exercises or extend the workout in the first month. People get excited and pile on more, then burn out. Stick with these five exercises for at least 4-6 weeks. Master them. Make them a genuine habit. Then you can think about adding variation or intensity.
What to Expect in 8 Weeks

Weeks 1-2: You’ll feel different before you look different. Energy improves, morning stiffness reduces, and everyday movements become easier. Sleep often improves slightly too.
Weeks 3-4: Subtle changes start. Your posture improves, which makes your belly appear flatter even before significant fat loss. Your core feels stronger. Clothes might fit differently around the waist.
Weeks 5-6: Visible changes begin appearing. Your stomach will look flatter, particularly first thing in the morning. You’ll notice more definition in your legs, and your overall shape starts to shift. Other people might comment that you look healthier.
Weeks 7-8: Results become obvious. Genuine reduction in belly overhang, better muscle definition, improved overall body composition. The changes accelerate because you’ve built muscle, which increases your metabolic rate.
Realistic expectations: you won’t lose 20 pounds of belly fat in 8 weeks. You might lose 4-8 pounds of actual fat, gain 2-3 pounds of muscle, and see a significant reduction in bloating and water retention. Your measurements will change more dramatically than the scale shows.
What accelerates results:
Protein intake matters more than most people realize. Aim for 1.6-2.0g per kilogram of bodyweight daily. Most people over 50 don’t eat nearly enough. Sleep is non-negotiable — 7-8 hours per night directly affects cortisol, insulin sensitivity, and appetite hormones. People who sleep less than six hours lose more muscle and less fat in a calorie deficit. Adding 6,000-8,000 steps daily on top of this routine makes a substantial difference without requiring formal exercise. And managing chronic stress helps keep cortisol from undoing your progress.
What slows results:
Drinking your calories is the biggest hidden sabotage — juice, smoothies, fancy coffees, and alcohol add significant calories without providing satiety. Weekend blow-outs can undo an entire week’s deficit. Not drinking enough water makes you hold onto it. And all-or-nothing thinking is the most common reason people quit — missing one workout or one meal doesn’t ruin anything; the problem is using one slip as an excuse to abandon the whole week.
Safety Precautions Before You Start

This routine is generally suitable for most people over 50, but certain conditions warrant a conversation with your doctor first.
Talk to your doctor before starting if you have any heart problems or a family history of heart disease, if your blood pressure isn’t well controlled, if you have diabetes (especially if you’re on insulin or blood sugar medications, since exercise increases insulin sensitivity and may require medication adjustment), if you’ve had recent surgery or injuries, if you have osteoporosis or a history of fractures, or if you have an artificial joint replaced within the last year.
Stop immediately if you experience:
- Chest pain or pressure — there’s no situation during exercise where this is normal
- Difficulty breathing that doesn’t resolve with rest
- True dizziness or feeling like you might pass out
- Sharp, stabbing pain in your knees, hips, shoulders, or back
- Numbness or tingling in your extremities
Worth discussing with your doctor if you notice:
- Persistent joint pain beyond 2-3 days post-workout
- Feeling drained for hours or days after exercise (not just immediately after)
- Existing pain being aggravated by the routine
- Consistently not recovering between sessions.
General principles for safe progression
Start lower than your ego wants, increase only one variable at a time (reps, rounds, or difficulty — not all at once), take rest days seriously (you improve during recovery, not during training), and know the difference between “this is hard” and “this hurts.” Hard is the goal. Hurting is a signal to stop and adjust.
- Source: https://pubmed.ncbi.nlm.nih.gov/9329340/
- Source: https://pubmed.ncbi.nlm.nih.gov/32081788/
- Source: https://www.health.harvard.edu/press_releases/declining-muscle-mass-is-part-of-aging-but-not-inevitable-from-the-march-2016-harvard-mens-health-watch
- Source: https://www.mdpi.com/2072-6643/14/4/816
- Source: https://pmc.ncbi.nlm.nih.gov/articles/PMC3747878/
- Source: https://www.cdc.gov/physical-activity/guidelines/index.html
- Source: https://www.livescience.com/health/food-diet/is-there-such-a-thing-as-too-much-protein
- Source: https://arxiv.org/abs/2312.05033